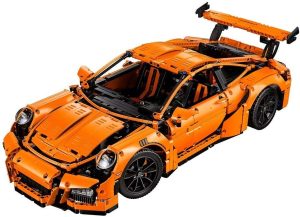
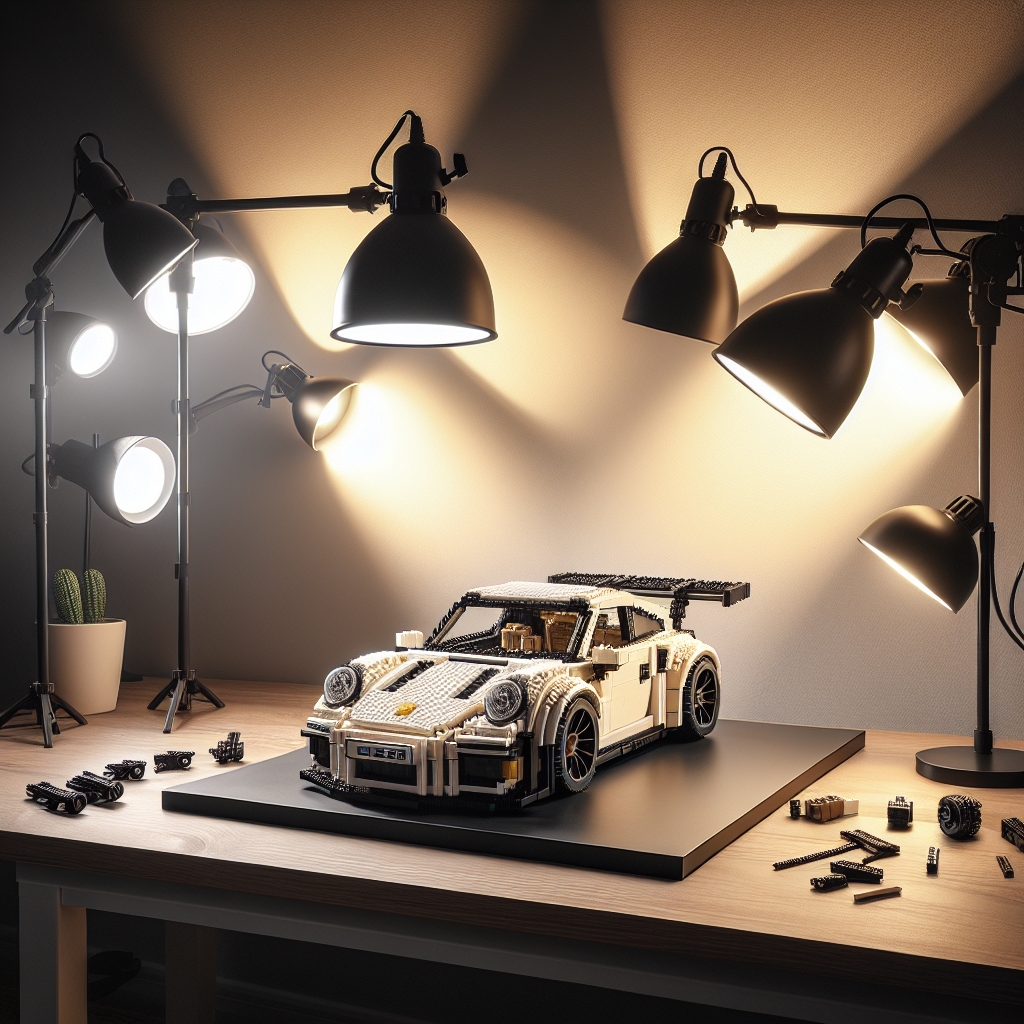
Discover creative ways to enhance your LEGO Porsche RSR display with lighting techniques that highlight details and elevate your showcase.
Incorporating lighting into your LEGO Porsche RSR display can enhance its visual appeal and highlight the intricate details of the model. Here are some steps and tips to effectively add lighting to your display:
### 1. **Choose the Right Lighting Type**
– **LED Strips:** Flexible and easy to install, LED strips can be cut to size and placed around the display.
– **Spotlights:** Small LED spotlights can be used to focus on specific areas of the model, such as the engine or interior.
– **Puck Lights:** These are small, round lights that can be placed under or around the display for a soft glow.
### 2. **Plan Your Layout**
– **Positioning:** Decide where you want to place the lights. Consider highlighting the front, rear, and interior of the Porsche RSR.
– **Wiring:** Plan how you will run the wires. Keep them hidden as much as possible to maintain a clean look.
### 3. **Select a Power Source**
– **Battery-Powered:** Ideal for portability, battery packs can be placed discreetly behind or under the display.
– **USB-Powered:** If your display is stationary, USB-powered lights can be plugged into a wall outlet or power bank.
### 4. **Install the Lighting**
– **Mounting:** Use adhesive pads or clips to secure the lights in place. Ensure they are positioned to avoid direct glare.
– **Testing:** Before finalizing the installation, test the lights to see how they illuminate the model.
### 5. **Create a Base for the Display**
– **Display Case:** Consider using a display case with built-in lighting or one that can accommodate additional lights.
– **Custom Base:** Build a custom base with compartments for lights and wiring, ensuring it complements the Porsche RSR design.
### 6. **Add Ambient Lighting**
– **Background Lighting:** Use soft LED strips behind the display to create a halo effect, enhancing the overall presentation.
– **Color Filters:** Experiment with colored filters or gels to create different moods or themes for your display.
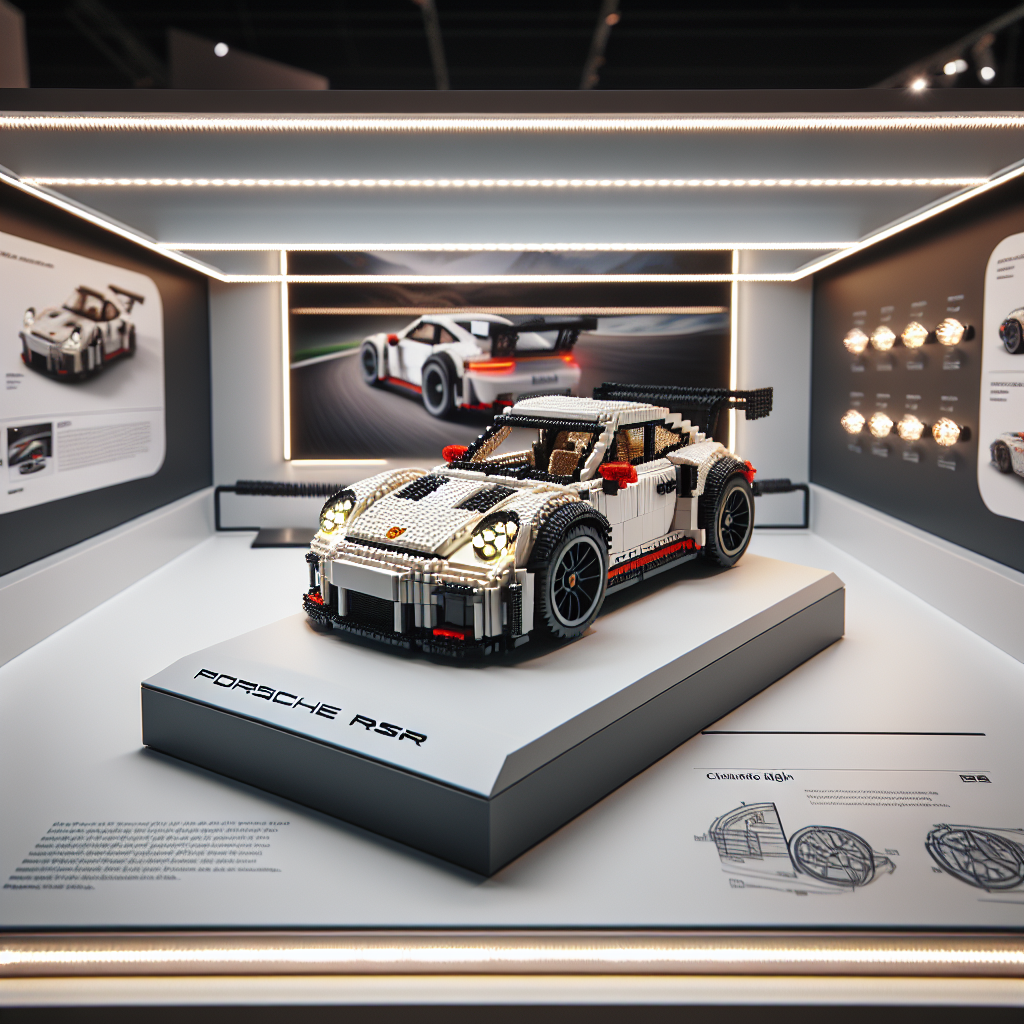
### 7. **Highlight Specific Features**
– **Engine Bay:** Use small spotlights to illuminate the engine compartment, showcasing the details.
– **Interior Lighting:** Consider adding lights inside the car to highlight the dashboard and seats.
### 8. **Consider Remote Control Options**
– **Smart Lighting:** Look for LED lights that can be controlled via remote or smartphone apps for added convenience.
– **Dimming Features:** Choose lights with dimming capabilities to adjust the brightness based on your preference.
### 9. **Maintain Safety**
– **Heat Management:** Ensure that the lights do not overheat, especially if they are left on for extended periods.
– **Secure Wiring:** Keep wires tidy and secure to prevent tripping hazards or accidental disconnections.
### 10. **Showcase Your Work**
– **Photography:** Once your lighting is set up, take photos of your display in different lighting conditions to showcase the effects.
– **Social Media:** Share your illuminated LEGO Porsche RSR on social media platforms or LEGO fan forums to inspire others.
By following these steps, you can create a stunning illuminated display that showcases your LEGO Porsche RSR in all its glory!
Incorporating lighting into your LEGO Porsche RSR display can enhance its visual appeal and highlight the intricate details of the model. Here are some steps and tips to effectively add lighting to your display:
Incorporating lighting into your LEGO Porsche RSR display can significantly enhance its visual appeal and accentuate the intricate details of the model. Below are steps and tips to effectively add lighting to your display:
### Steps to Incorporate Lighting:
1. **Select Appropriate Lighting:**
– Choose LED lights for their brightness, energy efficiency, and longevity. Consider warm white lights for a classic look or colored lights for a more dynamic effect.
2. **Plan Your Layout:**
– Before installation, sketch a layout of your display. Identify key areas of the Porsche RSR that you wish to highlight, such as the engine compartment, headlights, and interior.
3. **Gather Necessary Materials:**
– In addition to LED lights, you may need adhesive putty, wires, a power source (battery pack or USB), and possibly a light controller for more complex setups.
4. **Install the Lighting:**
– Carefully position the LED lights in your display. For headlights, consider using small, focused lights. For interior lighting, use softer lights to create a warm ambiance. Ensure that wires are neatly tucked away to maintain a clean appearance.
5. **Test the Lighting:**
– Before finalizing the installation, test the lights to ensure they function correctly and achieve the desired effect. Adjust the positioning as necessary.
6. **Secure the Setup:**
– Once satisfied with the lighting arrangement, secure the lights and wires using adhesive putty or clips to prevent movement and ensure stability.
7. **Final Touches:**
– Add any additional elements, such as a lighted display case or backdrop, to further enhance the overall presentation of your LEGO Porsche RSR.
### Tips for Effective Lighting:
– **Use Diffusers:** If the lights are too harsh, consider using diffusers to soften the light and create a more pleasing effect.
– **Highlight Key Features:** Focus on illuminating specific features of the model, such as the wheels, engine, or unique design elements, to draw attention to the craftsmanship.
– **Experiment with Colors:** Utilize colored LED lights to create different moods or themes. For instance, blue lights can evoke a nighttime racing atmosphere.
– **Consider a Remote Control:** For convenience, consider integrating a remote control system to easily turn the lights on and off or adjust brightness levels.
– **Maintain Accessibility:** Ensure that the power source is easily accessible for changing batteries or plugging in the display.
By following these steps and tips, you can create a stunning illuminated display that showcases your LEGO Porsche RSR in all its glory, captivating viewers and enhancing their appreciation of the model’s intricate design.
### 1. **Choose the Right Lighting Type**
### 1. Choose the Right Lighting Type
Selecting the appropriate lighting type is crucial for creating the desired ambiance and functionality in any space. Here are some key considerations to guide your decision:
#### a. **Ambient Lighting**
This is the primary source of light in a room, providing overall illumination. It sets the tone and mood of the space. Common sources include ceiling-mounted fixtures, chandeliers, and recessed lighting. When choosing ambient lighting, consider the size of the room and the height of the ceilings to ensure adequate coverage.
#### b. **Task Lighting**
Task lighting is designed to illuminate specific areas where activities such as reading, cooking, or working take place. Examples include desk lamps, under-cabinet lights, and pendant lights over workspaces. Ensure that task lighting is bright enough to reduce eye strain while being positioned to minimize shadows.
#### c. **Accent Lighting**
Accent lighting is used to highlight particular features or objects within a space, such as artwork, architectural details, or plants. This type of lighting can be achieved through spotlights, wall sconces, or track lighting. When selecting accent lighting, consider the intensity and direction of the light to create the desired effect.
#### d. **Natural Lighting**
Incorporating natural light can enhance the overall atmosphere of a space. Consider the placement of windows, skylights, and reflective surfaces to maximize daylight. Utilizing sheer curtains or blinds can help control the amount of natural light while maintaining privacy.
#### e. **Smart Lighting**
With advancements in technology, smart lighting systems allow for greater control over the lighting environment. These systems can be programmed to adjust brightness, color, and timing, providing flexibility for various activities and moods. Consider integrating smart lighting solutions for added convenience and energy efficiency.
### Conclusion
Choosing the right lighting type involves understanding the specific needs of your space and the activities that will take place within it. By thoughtfully combining ambient, task, accent, natural, and smart lighting, you can create a well-lit environment that enhances both functionality and aesthetic appeal.
– **LED Strips:** Flexible and easy to install, LED strips can be cut to size and placed around the display
**LED Strips:** These flexible lighting solutions are designed for easy installation and can be customized to fit various dimensions by being cut to size. They can be strategically placed around displays to enhance visual appeal and provide effective illumination.
Explore the fascinating world of LEGO cars, from their evolution and building techniques to customization and educational benefits. Discover how these models blend creativity and engineering, offering endless fun for builders of all ages.
Explore the exciting world of LEGO cars! This article delves into their history, design principles, educational benefits, and the vibrant community surrounding LEGO car building.