Unleash your creativity! Learn how to design your own LEGO Technic supercar with tips on mechanics, aesthetics, and custom features. Start building today!
Designing your own LEGO Technic supercar can be a fun and rewarding project! Here’s a step-by-step guide to help you through the process:
### Step 1: Conceptualize Your Design
1. **Research**: Look at existing LEGO Technic supercars for inspiration. Note their features, shapes, and functions.
2. **Sketch**: Draw rough sketches of your supercar. Consider the overall shape, size, and any unique features you want to include (e.g., spoilers, exhausts, etc.).
### Step 2: Plan the Features
1. **Functionality**: Decide what functions you want your supercar to have. Common features include:
– Working doors (scissor, gullwing, etc.)
– Steering mechanism
– Suspension system
– Engine details (pistons, moving parts)
– Working headlights and taillights
– Gearbox for speed variations
2. **Aesthetics**: Think about the color scheme and design elements that will make your car visually appealing.
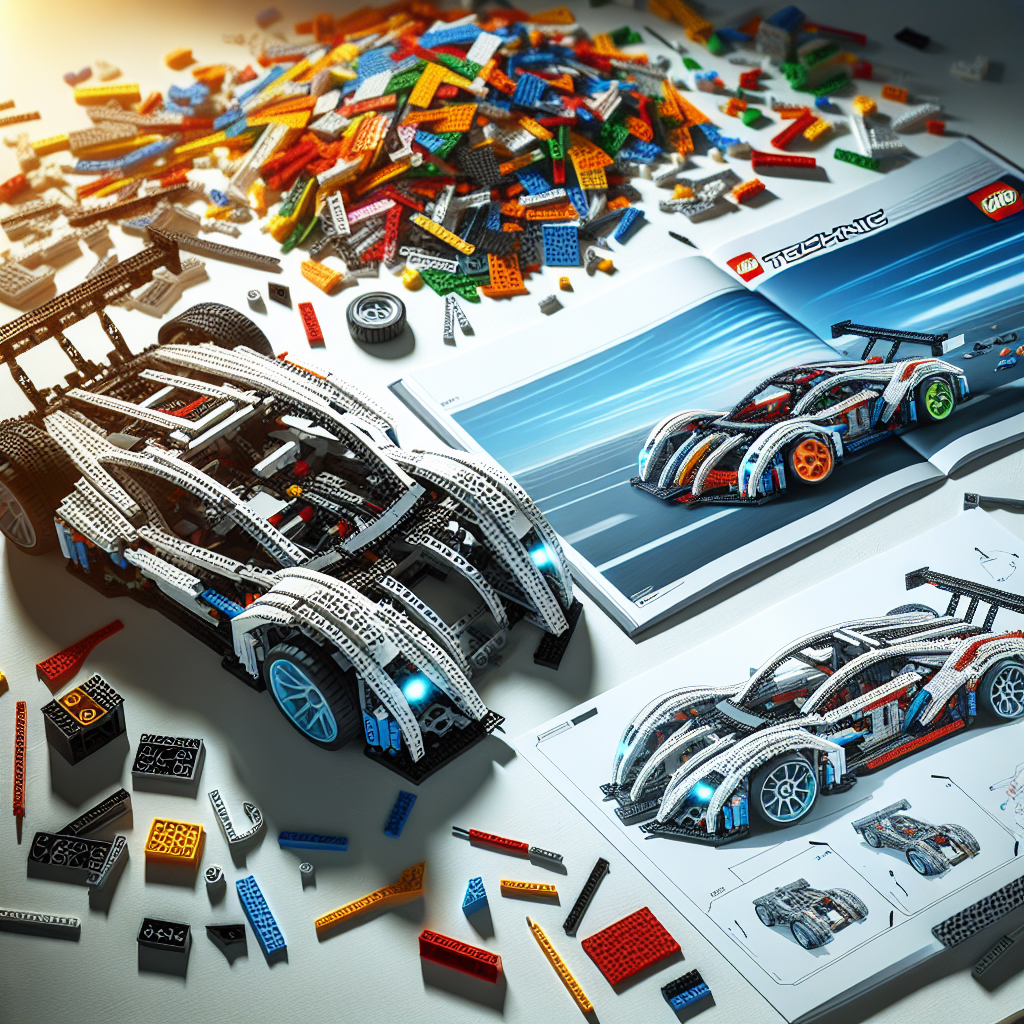
### Step 3: Gather Your Parts
1. **Inventory**: Check your existing LEGO Technic parts. Make a list of what you have and what you might need.
2. **Purchase Additional Parts**: If necessary, buy additional LEGO Technic pieces from online stores, LEGO stores, or marketplaces.
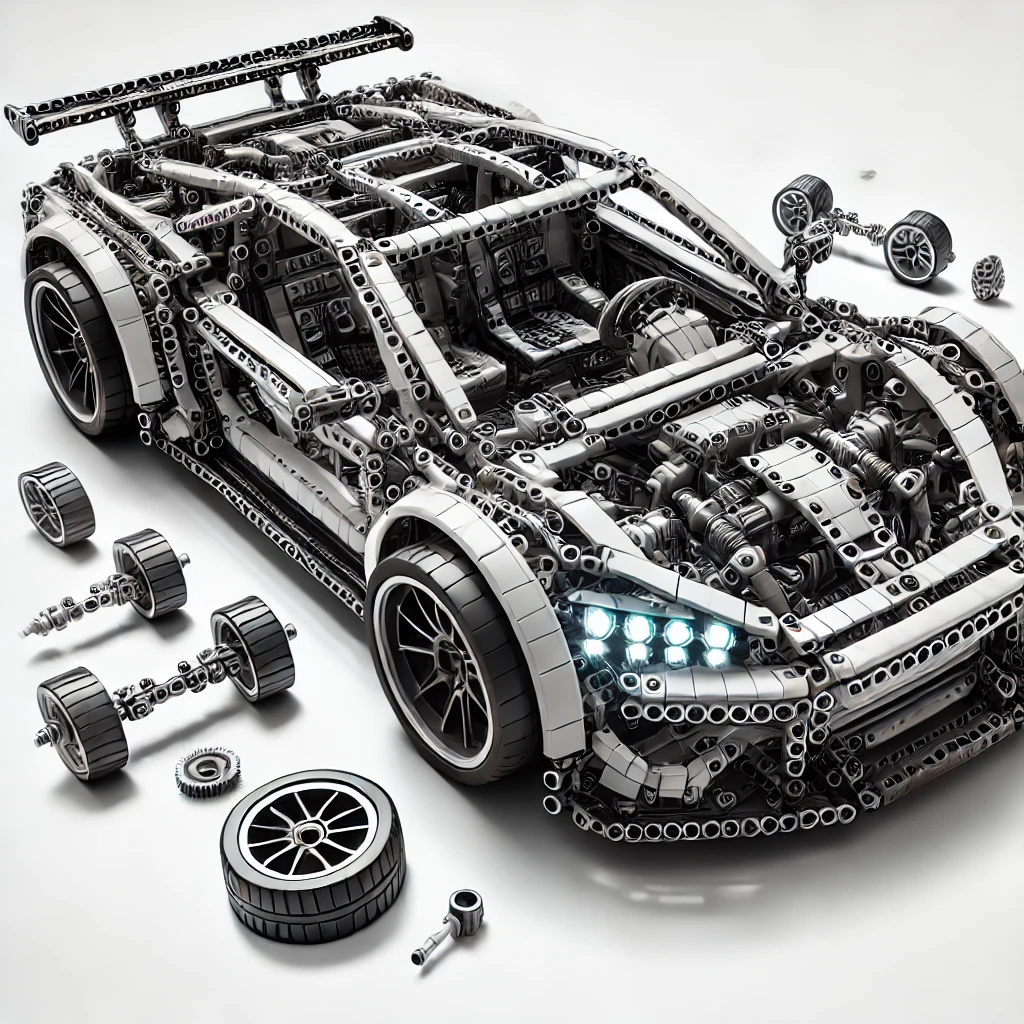
### Step 4: Build the Chassis
1. **Base Structure**: Start with a strong base. Use beams and connectors to create a sturdy chassis that can support the weight of the car and any moving parts.
2. **Dimensions**: Ensure the dimensions are proportional to a supercar. Consider the wheelbase and overall length.
### Step 5: Add the Drivetrain
1. **Wheels and Axles**: Attach wheels and ensure they can rotate freely. Use axles to connect the wheels to the chassis.
2. **Motorization (Optional)**: If you want your supercar to be motorized, consider adding a LEGO Power Functions motor or a LEGO Powered Up system.
### Step 6: Build the Body
1. **Panels and Fairings**: Use panels to create the body shape. Experiment with different angles and curves to achieve a sleek look.
2. **Details**: Add details like headlights, grilles, and air intakes using smaller pieces. Consider using stickers or decals for added realism.
### Step 7: Interior Design
1. **Seats and Dashboard**: Create a simple interior with seats and a dashboard. You can use small pieces to represent controls and displays.
2. **Steering Wheel**: Add a steering wheel that connects to the front wheels if you have a steering mechanism.
### Step 8: Test and Refine
1. **Functionality Check**: Test all moving parts (doors, wheels, steering) to ensure they work as intended.
2. **Stability**: Check the stability of the car. Make adjustments to the chassis or body if necessary.
### Step 9: Final Touches
1. **Color and Detailing**: Add any final touches, such as stickers, additional colors, or custom elements to enhance the look of your supercar.
2. **Photography**: Take photos of your creation from different angles to showcase your design.
### Step 10: Share Your Creation
1. **Online Communities**: Share your design on LEGO forums, social media, or platforms like Flickr or Instagram.
2. **Feedback**: Engage with other LEGO enthusiasts to get feedback and suggestions for future builds.
### Tips:
– **Be Patient**: Building a custom LEGO Technic supercar can take time. Don’t rush the process.
– **Experiment**: Don’t be afraid to try new techniques or designs. If something doesn’t work, learn from it and try again.
– **Use Online Resources**: There are many tutorials and videos available that can provide additional guidance and inspiration.
Enjoy the building process, and let your creativity shine!
Designing your own LEGO Technic supercar can be a fun and rewarding project! Here’s a step-by-step guide to help you through the process:
Designing your own LEGO Technic supercar can be an engaging and fulfilling endeavor. Below is a structured step-by-step guide to assist you in the design process:
### Step 1: Conceptualization
1. **Research and Inspiration**: Begin by researching existing supercar designs. Look at various models for inspiration, noting their unique features, shapes, and functionalities.
2. **Define Your Vision**: Decide on the key characteristics of your supercar. Consider aspects such as size, color scheme, and specific features (e.g., doors, engine type, or aerodynamics).
### Step 2: Planning
1. **Sketch Your Design**: Create rough sketches of your supercar. Focus on the overall shape, proportions, and any distinctive elements you wish to include.
2. **List Required Features**: Identify the features you want to incorporate, such as working doors, a detailed engine, or a functioning steering system.
### Step 3: Selecting Components
1. **Gather LEGO Technic Pieces**: Collect the necessary LEGO Technic bricks and components. Ensure you have a variety of gears, axles, beams, and panels to facilitate your design.
2. **Consider Functionality**: Choose pieces that will allow for movement and functionality, such as wheels, motors, and suspension elements.
### Step 4: Building the Chassis
1. **Construct the Base**: Start by building a sturdy chassis that will support the weight of your supercar. Use beams and connectors to create a solid foundation.
2. **Incorporate Suspension**: If desired, integrate a suspension system to enhance realism and functionality.
### Step 5: Designing the Body
1. **Shape the Exterior**: Begin adding panels and bricks to form the body of the supercar. Pay attention to aerodynamics and aesthetics.
2. **Detailing**: Add details such as headlights, taillights, and any other design elements that enhance the visual appeal of your model.
### Step 6: Adding Functionality
1. **Integrate Moving Parts**: If your design includes features like opening doors or a functioning steering system, ensure these components are properly connected and operational.
2. **Test Mechanisms**: Regularly test any moving parts during the building process to ensure they function as intended.
### Step 7: Final Assembly
1. **Refine Your Design**: Make any necessary adjustments to improve the overall look and functionality of your supercar. This may involve reworking certain sections or adding additional details.
2. **Secure All Components**: Ensure that all pieces are firmly attached and that the structure is stable.
### Step 8: Review and Iterate
1. **Evaluate Your Model**: Take a step back and assess your supercar. Consider its aesthetics, functionality, and overall design.
2. **Make Improvements**: Based on your evaluation, make any final adjustments or enhancements to your model.
### Step 9: Showcase Your Creation
1. **Display Your Supercar**: Once you are satisfied with your design, find a suitable way to display your LEGO Technic supercar. Consider creating a diorama or a dedicated shelf.
2. **Share Your Work**: Document your design process and share your creation with the LEGO community, whether through social media, forums, or local clubs.
### Conclusion
Designing a LEGO Technic supercar is a creative process that combines engineering principles with artistic expression. By following these steps, you can create a unique and functional model that reflects your vision and skills. Enjoy the journey of building and let your imagination drive your design!
### Step 1: Conceptualize Your Design
### Step 1: Conceptualize Your Design
**Objective:** To establish a clear and coherent vision for the design project, ensuring that all elements align with the intended purpose and audience.
#### 1. Define the Purpose
– **Identify the Goal:** What is the primary objective of the design? (e.g., to inform, persuade, entertain)
– **Target Audience:** Who will be the end-users or viewers? Consider demographics, preferences, and needs.
#### 2. Research and Inspiration
– **Market Analysis:** Investigate existing designs within the same domain. What works well? What doesn’t?
– **Gather Inspiration:** Collect visual references, color palettes, typography, and layouts that resonate with your vision.
#### 3. Establish Key Messages
– **Core Message:** What is the main message or theme you want to convey through your design?
– **Supporting Messages:** Identify secondary messages that complement the core message.
#### 4. Concept Development
– **Brainstorm Ideas:** Generate a variety of concepts and approaches. Consider different styles, formats, and techniques.
– **Sketch Initial Concepts:** Create rough sketches or digital mockups to visualize ideas. Focus on layout, composition, and flow.
#### 5. Define Design Elements
– **Color Palette:** Choose colors that reflect the brand identity and evoke the desired emotional response.
– **Typography:** Select fonts that enhance readability and align with the overall tone of the design.
– **Imagery and Graphics:** Determine the type of images or graphics that will support the design and reinforce the message.
#### 6. Create a Mood Board
– **Visual Compilation:** Assemble a mood board that encapsulates the overall aesthetic, including colors, typography, imagery, and textures.
– **Reference Points:** Use the mood board as a reference throughout the design process to maintain consistency.
#### 7. Feedback and Iteration
– **Seek Input:** Share your concepts and mood board with stakeholders or peers for feedback.
– **Refine Ideas:** Use the feedback to refine and iterate on your design concepts, ensuring alignment with the project goals.
#### 8. Finalize Concept
– **Select the Best Concept:** Choose the most promising design direction based on feedback and alignment with objectives.
– **Document the Concept:** Create a brief that outlines the chosen concept, including rationale, key messages, and design elements.
By following these steps, you will establish a solid foundation for your design project, ensuring that it is purposeful, cohesive, and tailored to your audience’s needs.
**Research**: Look at existing LEGO Technic supercars for inspiration. Note their features, shapes, and functions
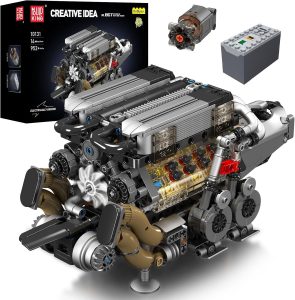
### Research on Existing LEGO Technic Supercars
LEGO Technic has a rich history of producing intricate and detailed supercar models that capture the essence of real-world automotive engineering. Below is an analysis of notable features, shapes, and functions found in existing LEGO Technic supercars, which can serve as inspiration for future designs.
#### 1. **Notable Models**
– **LEGO Technic Porsche 911 GT3 RS (42056)**
– **Features**:
– Detailed engine with moving pistons.
– Functional rear spoiler that adjusts based on speed.
– Working steering system with a functional steering wheel.
– Opening doors and trunk.
– **Shapes**:
– Sleek, aerodynamic body with smooth curves.
– Distinctive front and rear light assemblies.
– **Functions**:
– Gearbox with multiple speeds.
– Suspension system that mimics real-life dynamics.
– **LEGO Technic Bugatti Chiron (42083)**
– **Features**:
– W16 engine with moving pistons.
– Functional quad-turbocharged engine representation.
– Detailed interior with a working steering wheel.
– Opening hood and trunk.
– **Shapes**:
– Low-profile design with sharp angles and a wide stance.
– Iconic front grille and rear light design.
– **Functions**:
– Working gearbox with a 8-speed transmission.
– Adjustable rear wing for aerodynamic performance.
– **LEGO Technic Lamborghini Sián FKP 37 (42115)**
– **Features**:
– Hybrid powertrain representation.
– Detailed interior with a dashboard and steering wheel.
– Opening scissor doors.
– **Shapes**:
– Aggressive styling with angular lines and a low silhouette.
– Distinctive front and rear light configurations.
– **Functions**:
– Working V12 engine with moving pistons.
– Functional suspension system.
#### 2. **Common Features Across Models**
– **Engine Representation**: Most supercar models feature a detailed engine with moving parts, often simulating the real engine’s operation.
– **Functional Components**: Many models include working features such as steering, suspension, and gearboxes, enhancing the interactive experience.
– **Opening Parts**: Doors, hoods, and trunks that open to reveal detailed interiors or engine compartments are common, adding to the realism.
– **Aerodynamic Elements**: Adjustable spoilers and air intakes are often included to reflect the performance aspects of real supercars.
#### 3. **Design Shapes**
– **Aerodynamic Profiles**: The overall shape of LEGO Technic supercars tends to be low and wide, mimicking the aerodynamic profiles of real supercars.
– **Curved and Angular Lines**: A combination of smooth curves and sharp angles is used to create a visually striking appearance that reflects modern automotive design trends.
– **Distinctive Grilles and Lights**: Each model often features unique front grilles and light designs that are iconic to the respective car brands.
#### 4. **Functional Aspects**
– **Gear Mechanisms**: Many models incorporate complex gear systems that allow for multiple speeds or functions, enhancing the playability and educational value.
– **Suspension Systems**: Realistic suspension systems are often included to simulate the handling characteristics of supercars.
– **Steering Systems**: Functional steering linked to the front wheels is a common feature, allowing for realistic maneuverability.
### Conclusion
The existing LEGO Technic supercars showcase a blend of intricate design, functional engineering, and aesthetic appeal. By analyzing these models, future designs can incorporate similar features, shapes, and functions to create an engaging and realistic supercar experience. Emphasizing detailed engine representations, functional components, and aerodynamic shapes will be key in developing new models that resonate with both LEGO enthusiasts and automotive fans alike.
Explore the fascinating world of LEGO cars, from their evolution and building techniques to customization and educational benefits. Discover how these models blend creativity and engineering, offering endless fun for builders of all ages.
Explore the exciting world of LEGO cars! This article delves into their history, design principles, educational benefits, and the vibrant community surrounding LEGO car building.