Learn how to build a remote-controlled LEGO car with our step-by-step DIY guide. Perfect for beginners and LEGO enthusiasts alike!
Building a remote-controlled LEGO car can be a fun and educational project! Here’s a step-by-step guide to help you create your own:
### Materials Needed:
1. **LEGO Bricks**: Various bricks for the chassis, wheels, and body.
2. **LEGO Technic Parts**: Gears, axles, and connectors for better movement.
3. **LEGO Motors**: At least one motor for driving the car.
4. **LEGO Battery Pack**: To power the motors.
5. **Remote Control**: You can use a LEGO remote control system or a compatible RC system.
6. **LEGO Mindstorms or Powered Up Hub** (optional): For advanced control options.
7. **Wheels**: LEGO wheels that fit your design.
8. **Chassis Base**: A flat base to build your car on.
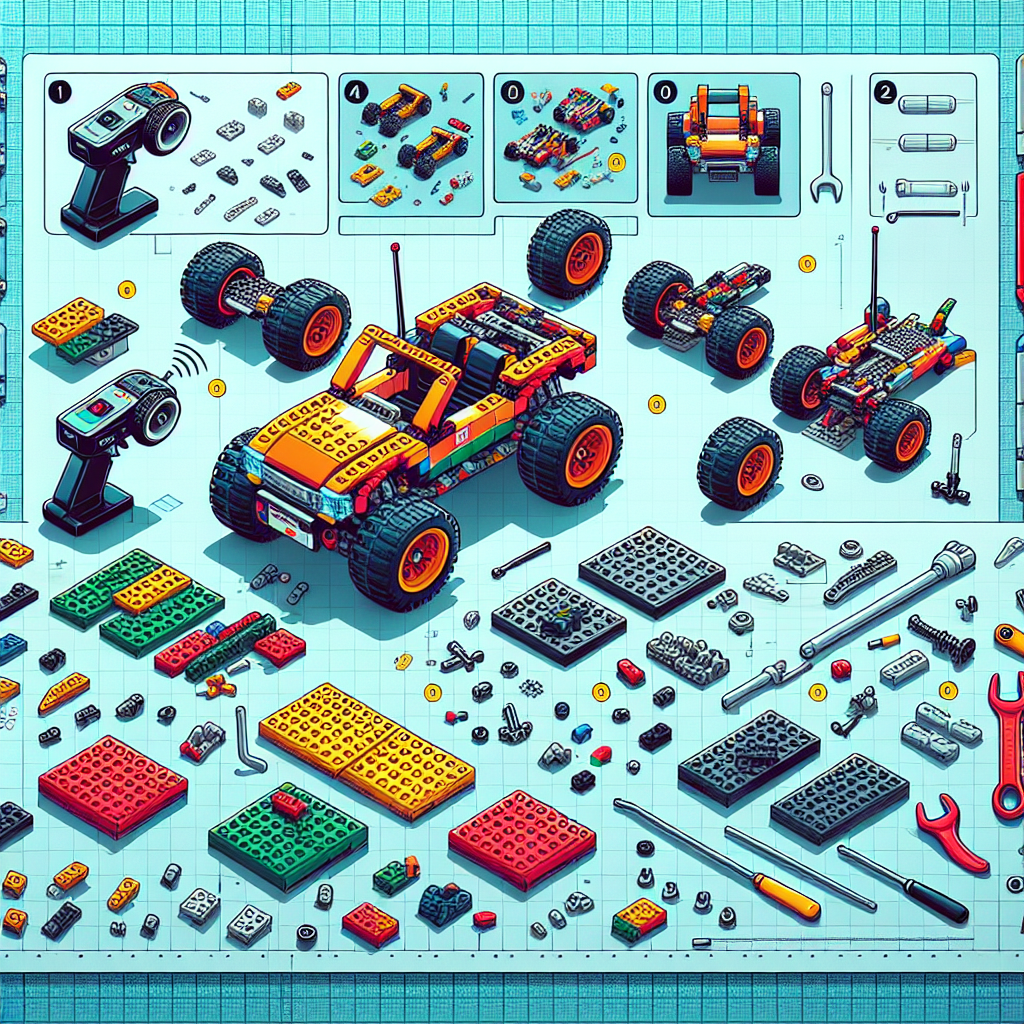
### Step-by-Step Instructions:
#### Step 1: Design the Chassis
– **Base**: Start with a flat base using LEGO plates. This will be the foundation of your car.
– **Structure**: Build a sturdy frame using LEGO bricks or Technic beams. Ensure it’s wide enough to accommodate the wheels and motors.
#### Step 2: Add Wheels
– **Axles**: Attach axles to the chassis where you want the wheels to go. Make sure they can rotate freely.
– **Wheels**: Attach the wheels to the axles. Ensure they are secure and can spin without obstruction.
#### Step 3: Install the Motor
– **Placement**: Choose a location for the motor. It can be at the back or front, depending on your design.
– **Connection**: Connect the motor to the wheels using gears or directly to the axles. If using gears, ensure they mesh properly for efficient movement.
#### Step 4: Add the Battery Pack
– **Power Source**: Secure the battery pack to the chassis. Make sure it’s easily accessible for changing batteries.
– **Wiring**: Connect the motor to the battery pack. If using a LEGO hub, follow the instructions for connecting the motor to the hub.
#### Step 5: Remote Control Setup
– **Choose a System**: If using a LEGO remote control system, follow the instructions to pair the remote with the hub or motor.
– **Testing**: Test the remote control to ensure it can operate the motor. If using a standard RC system, follow the manufacturer’s instructions for setup.
#### Step 6: Build the Body
– **Design**: Use additional LEGO bricks to create a body for your car. This can be as simple or complex as you like.
– **Aerodynamics**: Consider the shape for better movement and aesthetics.
#### Step 7: Final Adjustments
– **Test Drive**: Take your car for a test drive. Make adjustments to the motor placement, wheel alignment, or body design as needed.
– **Troubleshoot**: If the car doesn’t move as expected, check all connections, ensure the battery is charged, and verify that the remote control is functioning.
#### Step 8: Customize
– **Decorate**: Add stickers, paint, or additional LEGO pieces to personalize your car.
– **Enhancements**: Consider adding features like lights, sounds, or sensors for more advanced functionality.
### Tips:
– **Experiment**: Don’t be afraid to try different designs and configurations.
– **Research**: Look for inspiration online or in LEGO communities for unique ideas.
– **Safety**: Ensure all electronic components are safely secured and that there are no exposed wires.
### Conclusion
Building a remote-controlled LEGO car is a great way to learn about engineering and robotics. Enjoy the process, and have fun customizing your creation!
Building a remote-controlled LEGO car can be a fun and educational project! Here’s a step-by-step guide to help you create your own:
### Step-by-Step Guide to Building a Remote-Controlled LEGO Car
#### Introduction
Building a remote-controlled LEGO car is an engaging project that combines creativity, engineering, and programming skills. This guide will provide you with a structured approach to designing and constructing your own remote-controlled vehicle using LEGO components.
#### Materials Needed
1. **LEGO Bricks**: A variety of standard LEGO bricks, including wheels, axles, and chassis components.
2. **LEGO Power Functions or LEGO Mindstorms Kit**: For motorized movement and remote control capabilities.
3. **Remote Control**: A compatible remote control unit or a smartphone app if using LEGO Mindstorms.
4. **Batteries**: Ensure you have the appropriate batteries for your motors and remote control.
5. **Tools**: Basic tools for assembly (e.g., LEGO brick separator).
#### Step 1: Design the Chassis
1. **Plan Your Design**: Sketch a basic design for your car, considering the size and shape.
2. **Build the Base**: Use flat LEGO bricks to create a sturdy base for your car. Ensure it is wide enough to accommodate the wheels and motors.
3. **Add Support Structures**: Reinforce the chassis with additional bricks to ensure stability during movement.
#### Step 2: Attach the Wheels
1. **Select Wheels**: Choose appropriate wheels based on the desired speed and terrain.
2. **Install Axles**: Insert axles into the chassis and attach the wheels securely.
3. **Ensure Free Movement**: Test the wheels to ensure they rotate freely without obstruction.
#### Step 3: Integrate the Motors
1. **Choose Motors**: Select LEGO motors compatible with your control system (Power Functions or Mindstorms).
2. **Mount the Motors**: Securely attach the motors to the chassis, ensuring they align with the wheels for effective propulsion.
3. **Connect the Gears**: If necessary, use gears to connect the motors to the wheels for enhanced torque or speed.
#### Step 4: Set Up the Remote Control
1. **Connect the Receiver**: If using LEGO Power Functions, connect the receiver to the motors. For Mindstorms, follow the specific instructions for connecting the motors to the programmable brick.
2. **Test the Remote**: Ensure that the remote control is functioning correctly and can communicate with the receiver.
#### Step 5: Program the Car (if applicable)
1. **Download Software**: If using LEGO Mindstorms, download the appropriate programming software.
2. **Create a Program**: Write a simple program to control the car’s movements (forward, backward, turns).
3. **Upload the Program**: Transfer the program to the programmable brick.
#### Step 6: Final Assembly and Testing
1. **Secure All Components**: Double-check that all parts are securely attached and that wiring is organized.
2. **Conduct Initial Tests**: Test the car in a controlled environment to ensure it responds correctly to the remote control.
3. **Make Adjustments**: If necessary, make adjustments to improve performance, such as modifying the weight distribution or motor placement.
#### Step 7: Enjoy and Experiment
1. **Take It for a Spin**: Once satisfied with the performance, take your remote-controlled LEGO car for a test drive.
2. **Experiment with Modifications**: Consider adding features such as lights, sensors, or different wheel types to enhance functionality and performance.
#### Conclusion
Building a remote-controlled LEGO car is not only a fun activity but also an excellent way to develop problem-solving and engineering skills. By following this guide, you can create a unique vehicle and explore the endless possibilities of LEGO construction and programming. Enjoy your building experience!
### Materials Needed:
It seems like your request is incomplete. Could you please provide more context or specify what materials you need? For example, are you looking for materials for a specific project, event, or purpose? This will help me assist you better.
**LEGO Bricks**: Various bricks for the chassis, wheels, and body
**LEGO Bricks**: A versatile collection of interlocking plastic components designed for the construction of various models, including chassis, wheels, and body structures. These bricks facilitate creative assembly and engineering, allowing users to design and build intricate vehicles and structures. The modular nature of LEGO bricks promotes both imaginative play and educational opportunities in fields such as architecture, engineering, and design. Each brick is manufactured to precise specifications, ensuring compatibility and durability in a wide range of applications.
Explore the fascinating world of LEGO cars, from their evolution and building techniques to customization and educational benefits. Discover how these models blend creativity and engineering, offering endless fun for builders of all ages.
Explore the exciting world of LEGO cars! This article delves into their history, design principles, educational benefits, and the vibrant community surrounding LEGO car building.