Learn how to build a remote-controlled LEGO car with step-by-step instructions, tips, and tricks for an exciting DIY project! Perfect for all ages!
Building a remote-controlled LEGO car can be a fun and educational project! Here’s a step-by-step guide to help you create your own:
### Materials Needed:
1. **LEGO Bricks**: Various bricks for the chassis, body, and wheels.
2. **LEGO Wheels**: At least four wheels and corresponding axles.
3. **LEGO Technic Parts**: Gears, axles, and connectors for better stability and movement.
4. **LEGO Power Functions or LEGO Boost**: For remote control capabilities.
5. **Battery Pack**: To power the motors (if using LEGO Power Functions).
6. **Remote Control**: A compatible remote or app (if using LEGO Boost).
7. **Smartphone or Tablet**: If using LEGO Boost, for programming and control.
### Step-by-Step Instructions:
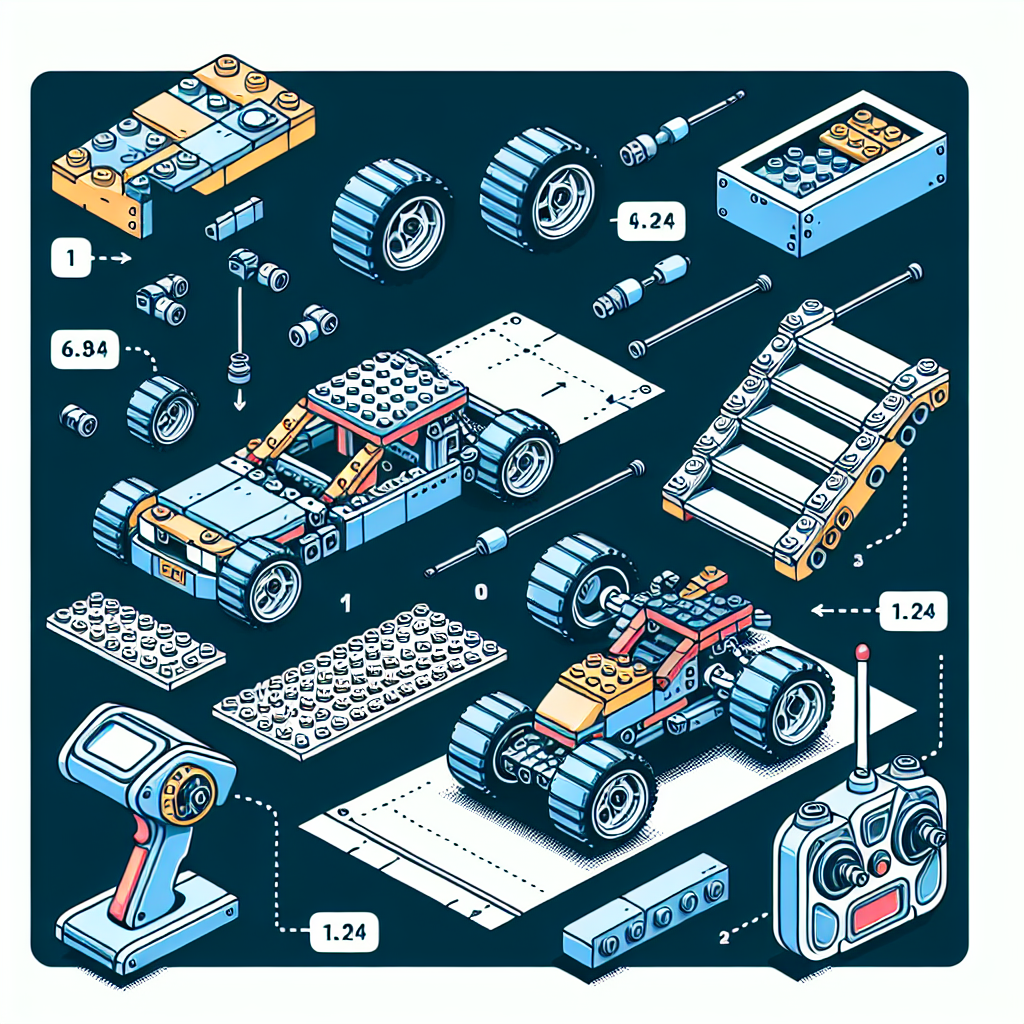
#### Step 1: Design the Chassis
1. **Base Structure**: Start by building a rectangular base using LEGO bricks. This will be the chassis of your car.
2. **Stability**: Use Technic bricks and beams to reinforce the structure. Make sure it’s sturdy enough to hold the motors and battery pack.
#### Step 2: Add Wheels
1. **Axles**: Insert axles through the chassis where you want the wheels to be.
2. **Attach Wheels**: Secure the wheels onto the axles. Ensure they spin freely and are aligned properly.
#### Step 3: Install Motors
1. **Choose Motors**: If using LEGO Power Functions, use the appropriate motors (e.g., L-Motor for driving).
2. **Mount Motors**: Attach the motors to the chassis. Position them so that they can drive the wheels directly or through gears.
3. **Connect Gears**: If necessary, use gears to connect the motors to the wheels for better torque and speed.
#### Step 4: Add Power Source
1. **Battery Pack**: Attach the LEGO battery pack to the chassis. Make sure it’s secure and accessible for changing batteries.
2. **Wiring**: Connect the motors to the battery pack according to the instructions provided with your LEGO Power Functions or Boost kit.
#### Step 5: Remote Control Setup
1. **Power Functions**: If using Power Functions, connect the remote control receiver to the battery pack and motors.
2. **LEGO Boost**: If using Boost, download the app on your smartphone or tablet and follow the instructions to connect your car.
3. **Test the Controls**: Make sure the remote control or app can successfully operate the motors.
#### Step 6: Build the Body
1. **Design**: Use additional LEGO bricks to create a body for your car. This can be as simple or complex as you like.
2. **Aerodynamics**: Consider the shape for better movement and aesthetics.
#### Step 7: Final Adjustments
1. **Test Drive**: Take your car for a test drive. Check for any issues with the wheels, motors, or remote control.
2. **Adjustments**: Make any necessary adjustments to improve performance, such as repositioning the weight or changing the gear ratios.
### Tips:
– **Experiment**: Try different designs and configurations to see what works best.
– **Decorate**: Personalize your car with colors and designs using LEGO bricks.
– **Learn**: Use this project to learn about basic engineering principles, such as torque, friction, and balance.
### Conclusion
Building a remote-controlled LEGO car is a great way to combine creativity with engineering skills. Enjoy the process, and don’t hesitate to modify your design as you learn what works best!
Building a remote-controlled LEGO car can be a fun and educational project! Here’s a step-by-step guide to help you create your own:
### Step-by-Step Guide to Building a Remote-Controlled LEGO Car
#### Introduction
Building a remote-controlled LEGO car is an engaging project that combines creativity, engineering, and programming skills. This guide will provide you with a structured approach to designing and constructing your own remote-controlled vehicle using LEGO components.
#### Materials Required
1. **LEGO Bricks**: Various sizes, including wheels, axles, and chassis components.
2. **LEGO Technic Elements**: Gears, beams, and connectors for enhanced functionality.
3. **Motor**: A LEGO-compatible motor (e.g., LEGO Power Functions or LEGO Boost).
4. **Remote Control**: A compatible remote control system (e.g., LEGO Power Functions remote or a smartphone app).
5. **Battery Pack**: To power the motor (e.g., LEGO battery box).
6. **Smartphone or Tablet (optional)**: For programming and controlling the car via an app.
#### Step 1: Design the Chassis
1. **Determine the Size**: Decide on the dimensions of your car based on the available LEGO pieces.
2. **Build the Base**: Use flat LEGO plates to create a sturdy base. Ensure it is wide enough to accommodate the wheels and motor.
3. **Add Support Structures**: Incorporate beams and connectors to reinforce the chassis and provide stability.
#### Step 2: Attach the Wheels
1. **Select Wheels**: Choose appropriate wheels based on the desired speed and terrain.
2. **Install Axles**: Insert axles through the chassis and attach the wheels securely.
3. **Ensure Free Movement**: Test the wheels to ensure they rotate freely without obstruction.
#### Step 3: Integrate the Motor
1. **Position the Motor**: Place the motor on the chassis, ensuring it aligns with the wheels for effective propulsion.
2. **Connect the Motor to the Wheels**: Use gears or direct connections to link the motor to the wheels, allowing for movement when powered.
#### Step 4: Set Up the Power Source
1. **Install the Battery Pack**: Secure the battery pack on the chassis, ensuring it is easily accessible for battery replacement.
2. **Connect Wires**: Attach the motor wires to the battery pack, ensuring proper polarity and secure connections.
#### Step 5: Implement Remote Control
1. **Choose a Control Method**: Decide whether to use a physical remote control or a smartphone app.
2. **Connect the Remote Control**: If using LEGO Power Functions, pair the remote with the receiver connected to the motor.
3. **Test the Controls**: Ensure that the remote control successfully operates the motor, allowing for forward and backward movement.
#### Step 6: Customize and Enhance
1. **Add Features**: Consider adding additional elements such as lights, sensors, or a steering mechanism for enhanced functionality.
2. **Decorate the Car**: Use LEGO bricks to create a unique design, adding aesthetic appeal to your vehicle.
#### Step 7: Test and Troubleshoot
1. **Conduct Initial Tests**: Run the car in a controlled environment to assess its performance.
2. **Identify Issues**: If the car does not operate as expected, check connections, battery levels, and motor functionality.
3. **Make Adjustments**: Modify the design or connections as necessary to improve performance.
#### Conclusion
Building a remote-controlled LEGO car is a rewarding project that fosters creativity and problem-solving skills. By following this guide, you can create a functional and enjoyable vehicle while gaining valuable insights into engineering and robotics. Enjoy your building experience!
### Materials Needed:
It seems like your request is incomplete. Could you please provide more context or specify what materials you need? For example, are you looking for materials for a specific project, event, or topic? This will help me assist you better.
**LEGO Bricks**: Various bricks for the chassis, body, and wheels
**LEGO Bricks Specification Document**
**1. Introduction**
This document outlines the specifications for the various LEGO bricks required for constructing a chassis, body, and wheels. The purpose of this specification is to ensure compatibility, structural integrity, and aesthetic appeal in the final assembly.
**2. Components Overview**
The LEGO construction will consist of three primary components: the chassis, the body, and the wheels. Each component will utilize specific types of LEGO bricks to achieve the desired functionality and design.
**3. Chassis**
The chassis serves as the foundational structure of the model. It must be robust enough to support the weight of the body and any additional components.
– **Brick Types:**
– **Plates:** 2×4, 2×6, and 1×2 plates for a stable base.
– **Bricks:** Standard 1×1, 1×2, and 2×2 bricks for vertical support.
– **Technic Bricks:** 1×4 and 1×6 for added strength and connection points.
– **Color Options:** Black, gray, or any neutral color to enhance the overall design.
**4. Body**
The body of the model is the outer shell that provides aesthetic appeal and may house additional features.
– **Brick Types:**
– **Slopes:** 2×1 and 2×2 slopes for a streamlined appearance.
– **Bricks:** 1×3, 1×4, and 2×3 bricks for the main structure.
– **Windows:** Transparent bricks or panels for visual elements.
– **Color Options:** Customizable based on design requirements; recommended colors include red, blue, yellow, or any desired hue.
**5. Wheels**
The wheels are critical for mobility and must be designed to fit securely onto the chassis.
– **Brick Types:**
– **Wheels:** Standard LEGO wheels (various diameters) compatible with the chassis.
– **Wheel Hubs:** Technic connectors to secure the wheels to the chassis.
– **Color Options:** Typically black or gray, but may vary based on design preferences.
**6. Assembly Guidelines**
– Ensure all bricks are compatible with standard LEGO dimensions.
– Utilize appropriate connectors and supports to maintain structural integrity.
– Follow design schematics to achieve the desired aesthetic and functional outcomes.
**7. Conclusion**
This specification document serves as a guideline for selecting and utilizing LEGO bricks for constructing a chassis, body, and wheels. Adhering to these specifications will ensure a successful and visually appealing assembly.
**8. Appendix**
– **Recommended Brick Sets:** List of specific LEGO sets that contain the required bricks.
– **Design Templates:** Diagrams illustrating potential configurations for the chassis, body, and wheels.
Explore the fascinating world of LEGO cars, from their evolution and building techniques to customization and educational benefits. Discover how these models blend creativity and engineering, offering endless fun for builders of all ages.
Explore the exciting world of LEGO cars! This article delves into their history, design principles, educational benefits, and the vibrant community surrounding LEGO car building.